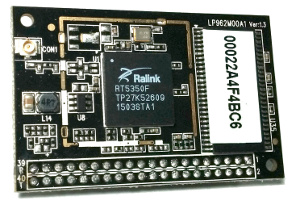
My friends here in Colorado started a new company called NixCore, a Linux enabled processor board that takes 1 Watt of power. They asked me to take their new NixCore X1 product for a spin and see what I could make with it. I looked around the lab/office and came upon my RGB LED strip from China. Since this RGB strip uses a variant of SPI I thought it would be a good test for the little NixCore X1 board.
The NixCore X1 is an Ralink RT5350 SoC (System on Chip) processor running at 360MHz, with 8MB of flash, and 32MB of RAM. The board takes only 1 watt of power (less than 200mA at 5V) and has all the outputs you would expect from a microcontroller, I2C, GPIO, PWM. It also has software based SPI (Since the SPI port is used by the flash) which is still pretty fast. I’ve worked with embedded Linux systems and know how much of a pain it is to get a driver running, so having a Linux install with an SPI driver exposed to userspace was a godsent. With some commands, a simple C file, and a Buildroot compiler I was able to port my Mbed code to the NixCore X1 pretty easily. All I had to do is make a new SPI device on some GPIO pins, open the “/dev/spidev1.0” device and start writing data to it, the driver takes care of all the hard stuff. Using C you can fopen(“/dev/spidev1.0″,”w”) and then write as any other file. Here are the steps:
Build the compiler:
NixCore helped me out with that, but just select mips32r2, Little Endian and uClib on Buildroot and you should be good.
Compile the code:
Given the code, you can control the strip via the command line
(Make sure you add -I and -L entries to the buildroot install)
Install the spi-gpio-custom-driver on the running X1:
insmod spi-gpio-custom bus0=1,22,23,24,0,50000
Run the code:
./[WHATEVER_YOU_NAMED_IT]
This driver is software based and (from my tests) runs up to 400KHz. It uses GPIOs 22 as CLK,23 as MOSI and 24 MOSI (Even though there is no input data) on the NixCore X1. This translates to pins 27,30 and 22 on the header. I hooked up the RGB strip directly to the 3.3V CLK and MOSI and wrote a simple C file based on my Mbed code.
Honestly, to my surprise I was able to control a single pixel of the strip right off the bat, I expected the driver functioned but I was still a little skeptical. It didn’t take long to address the entire strip. At a comm rate of 50KHz this updates the strip at about 40ms or 25 HZ. As I mentioned the rate could be updated to about 400KHz which would be about 200Hz for a 5M strip, more than enough to beat the human eye.
After I made the C application to set the color I took it a step further and added a web page and CGI script to change the color of the strip based on a web page.
Here are some videos of the strip in action:
And, of course, the code and webpage for the processing: Code1, Code2, Makefile, Webpage files.
Goto http://[IP_ADDRESS]/color.html
Overall I really like the NixCore X1 (I am biased since they are my buddies) but you might want to check them out at http://nixcores.com.

